Interested in enabling Google consent mode? Great call, it’s a fantastic tool and it makes it far easier to maintain compliance without losing all your marketing data.
Let’s keep it simple – we’ll walk you through the setup process and only weave in the technical stuff when we think it’s important you know it… but if you feel so inclined, feel free to have a gander through Google’s official consent mode documentation.
Before we begin… you should sort of understand how consent mode works
Google consent mode is basically a universal language that consent platforms like GetTerms use to share each user’s consent preferences with Google’s tags and tools. We use it to communicate whether a user has agreed to specific types of data collection (e.g. analytics storage, advertising storage or both), allowing Google to adjust its behavior accordingly.
There’s far more going on in the background, but thats the jist of it. Feel free to read our full guide if you want to know more about the inner workings.
Lets just say consent mode is worth your while, and we’re not shills. We use it too. The main reason: consent mode modelling.
Consent mode modelling fills gaps from non-consenting users with modelled data based on patterns from those who did consent. This helps you better predict user behavior and conversions when looking at the bigger picture.
1: Install Google Tag Manager on your website
Google Tag Manager is always required to configure Google Consent Mode correctly. If you’ve installed your Google Analytics Tag directly into your site’s <head>, you’ll need to remove it and install it with Google Tag Manager to ensure it doesn’t fire before consent settings are updated (We’ll show you how to do this later – just remove it for now).
Once signed in, enter your company details and click Save. You’ll be taken to the overview page.
From the overview page, click the button to add a cookie consent banner and cookie policy
Input your contact details for data privacy related inquiries
Click Add Cookie Banner & Policy
Navigate to the Google consent mode tab and enable Google consent mode. If you leave appearance and configuration settings set to default, your banner will now be set up to comply with the requirements of the Google EU User Consent Policy (EUUCP).
3: Embed your Consent Banner on your website correctly.
Select Installation under the Cookie Banner section of the sidebar menu.
Copy your cookie banner Embed code
Place the code snippet as high as possible inside your website’s <head> section. It must be the first <script> tag on the page.
4: Install the GetTerms Consent Mode tag template
Open Google Tag Manager and navigate to your container
In Tags, click New
Name the tag
Click Tag Configuration
Click “Discover more tag types in the Community Template Gallery”
Search for and select GetTerms CMP by GetTerms
Click Add to workspace
You will be asked to confirm whether you wish to add our template to your workspace. Click Add.
Click the Optional Settings accordion within the Tag Configuration Box
Enable the option to Manage the Get Terms consent banner with GTM rather than your dashboard. Note: Enable the option to Install the GetTerms consent banner via this GTM tag
Input your GetTerms ID found in your GetTerms dashboard
Scroll down to the box titled Triggering
Select Consent Initialization – All Pages
Click Save
5: Enable Consent Overview
While not explicitly required, enabling the consent overview panel helps you identify and edit which tags have or haven’t been configured for consent and update settings in bulk.
Open your container settings from the Admin tab.
Enable Consent Overview.
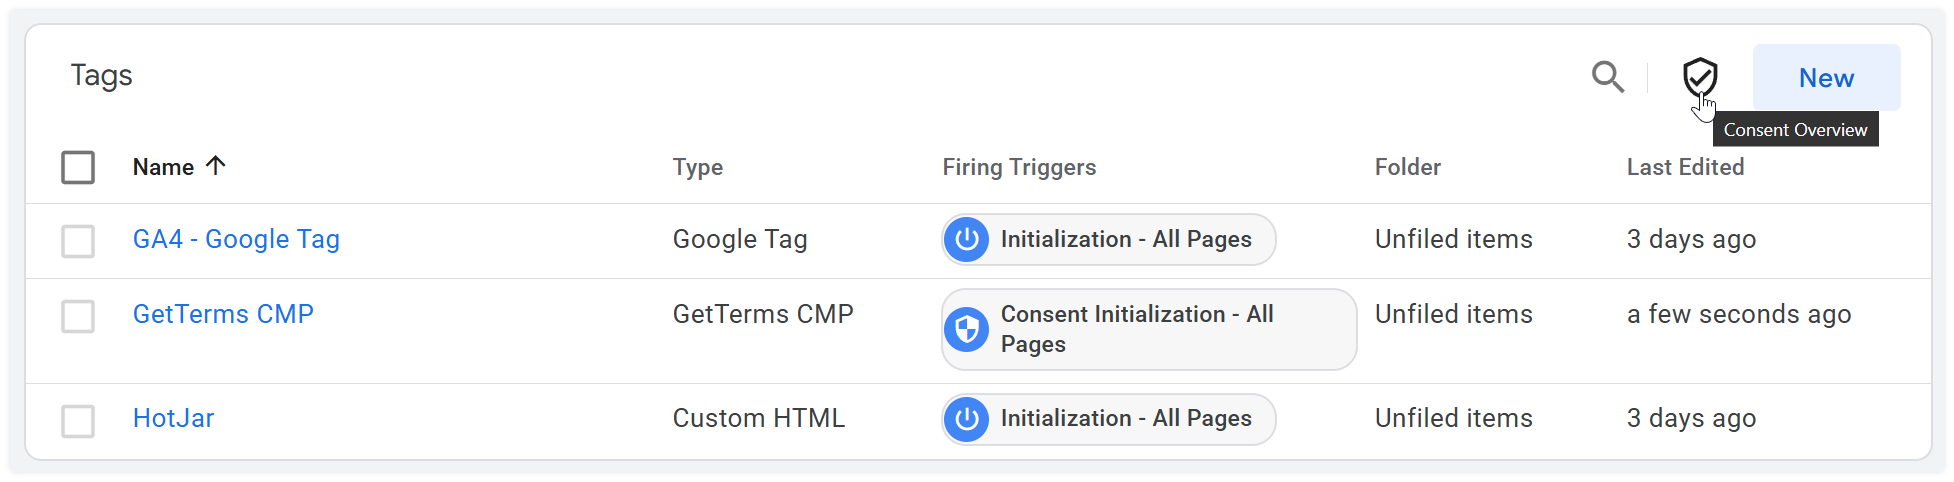
Once enabled, the consent overview panel can be opened from the tag tab of your work space.
If you’ve never setup your tags for consent, the consent overview window should inform you that none of your tags are configured for consent. Consent overview window
Selecting multiple tags lets you update their consent settings all at once.
6: Understanding which type of consent mode to implement
Sorry to stop the momentum, but this is important, as you will likely use Consent Mode for tags not covered in this guide.
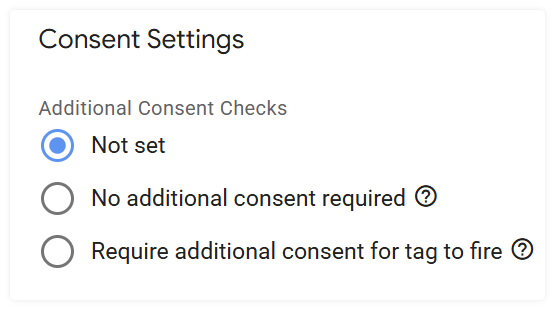
There are two types of consent mode implementations: advanced and basic. This usually corresponds with whether the tag requires additional consent checks before firing.
Not set = consent mode not implemented, tag will fire without consent
No additional consent required = advanced consent mode
Require additional consent for tag to fire = basic consent mode
Advanced consent mode
We have an entire article explaining consent mode. For the purpose of this guide, you just need to understand that when you use advanced consent mode, you’re allowing a tag to run without waiting for consent. This is only possible because these tags perform extra consent checks – called built-in consent checks – which will prevent them from setting cookies or collect any personal data unless the user consents.
Basic consent mode
In basic consent mode, a tag will only run after the relevant type of consent has been granted. Put simply, it adds consent checks for tags that do not already have them built in.
This mode is particularly useful for non-Google tags, as it allows you to quickly connect them to Google’s consent infrastructure. We will walk you through the setup process below.
Note: Setting non-google tags up with basic consent mode isn’t required if you have script blocking enabled in your GetTerms dashboard, but if you find that scripts are getting through script blocking, this might be due to the triggers you’ve set for these tags in GTM. Basic consent mode will ensure they don’t fire until consent is given.
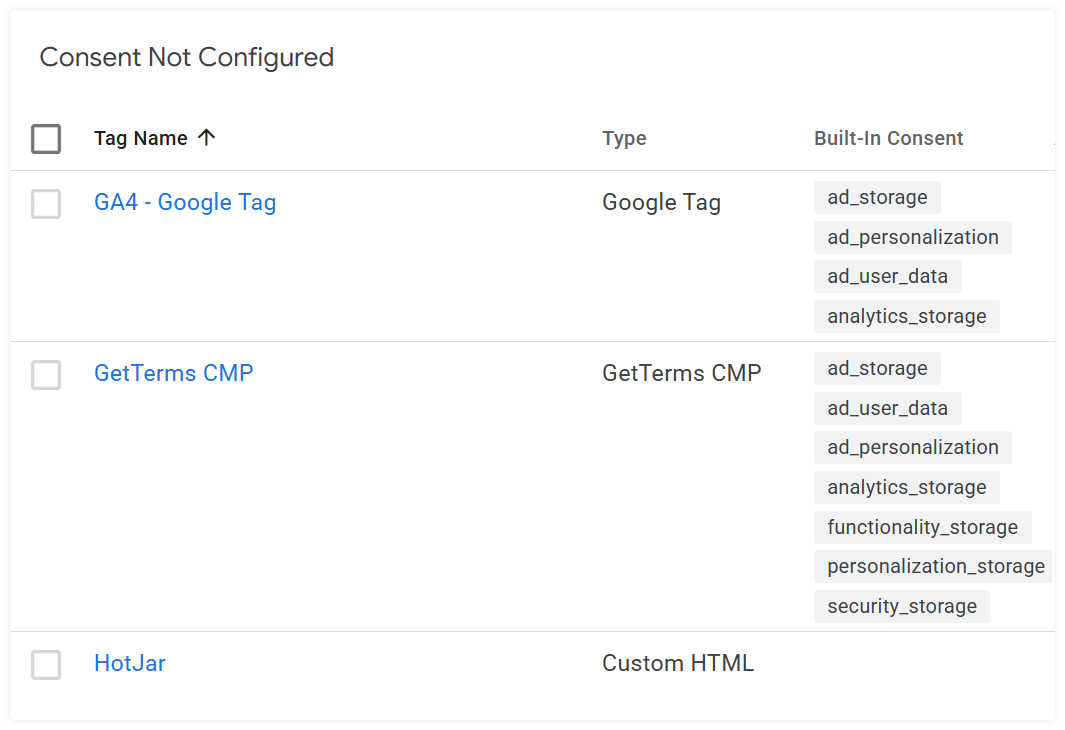
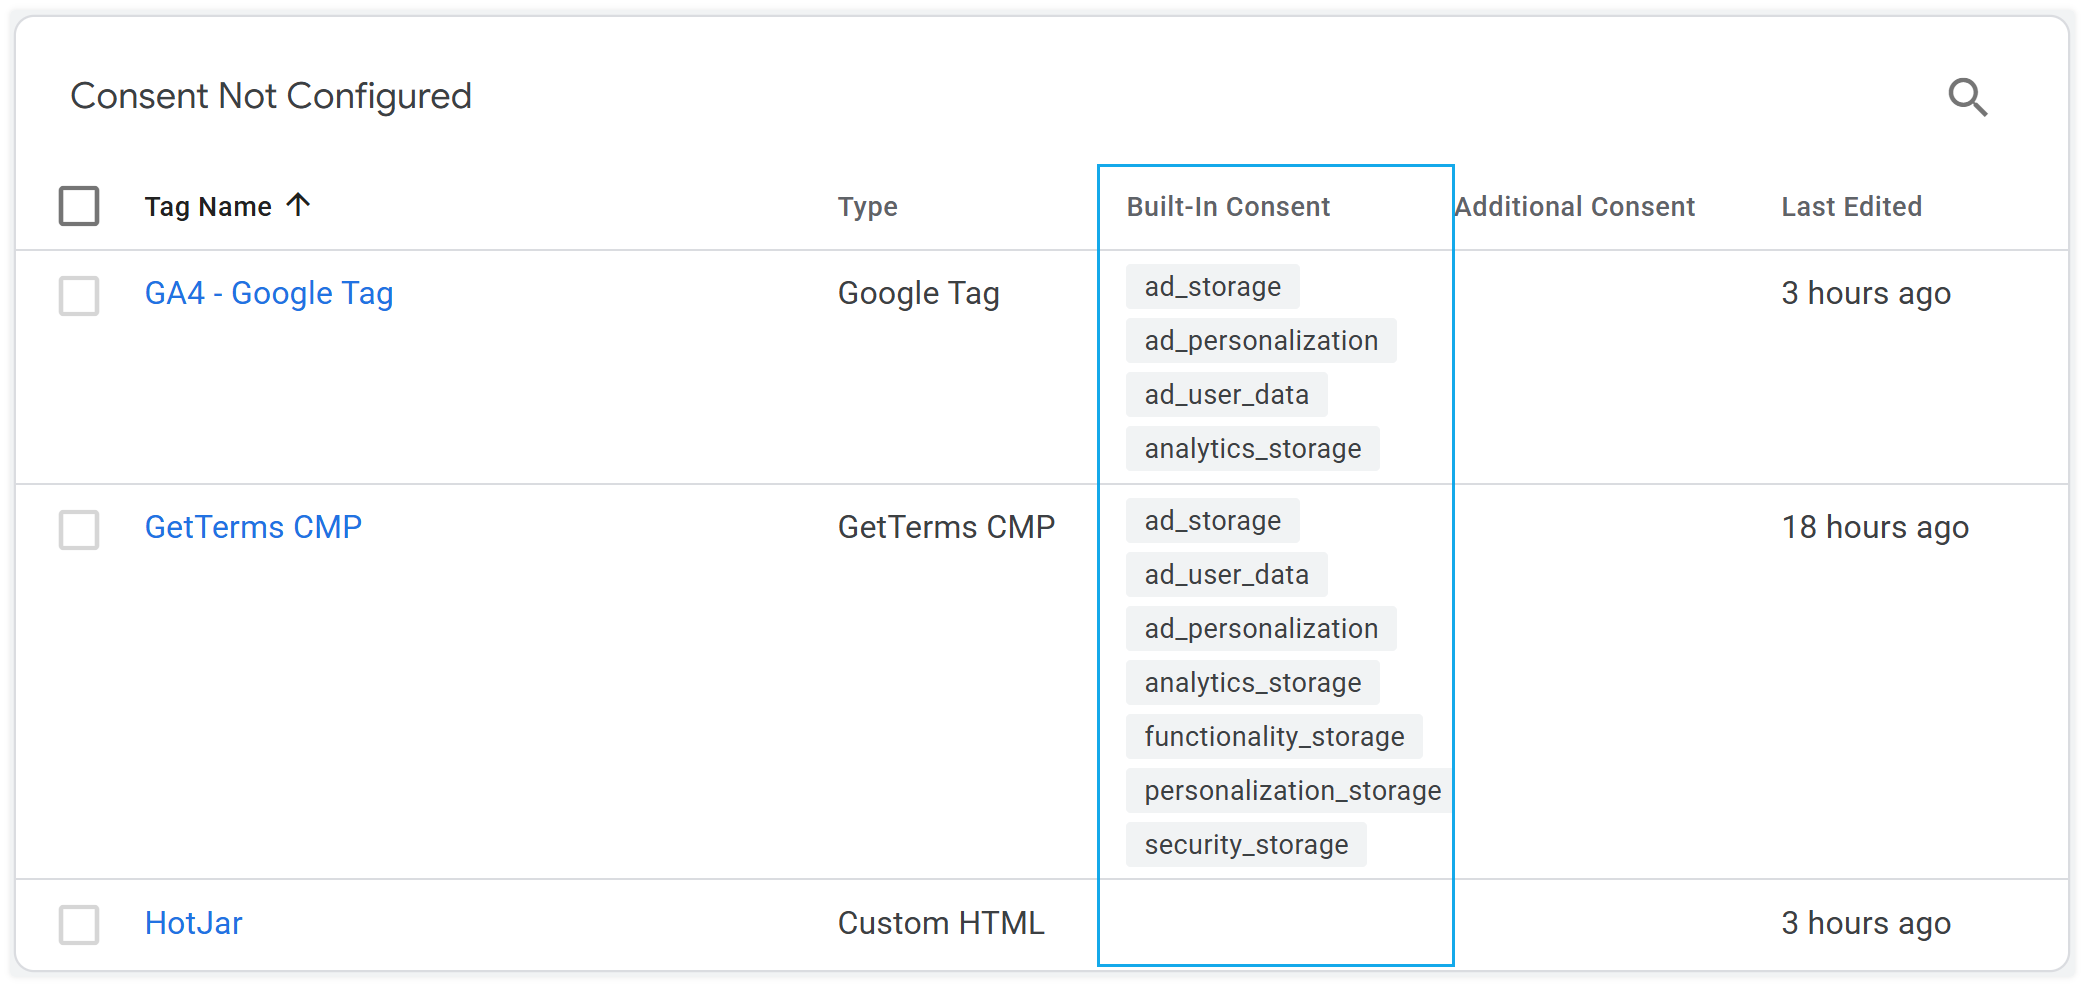
How to tell if a tag has built-in consent checks
Just look in the Built-in Consent column of the consent overview window. If you look at the image of the consent overview window below, you’ll see that while the Google tag and our tag contain a number of built in checks, the Hotjar tag contains none.
A good rule of thumb to follow: if it isn’t Google or a CMP, use basic consent mode.
7: Implementing advanced consent mode
From the consent overview window or your tag tab, select your Google Tag.
Click anywhere within the tag configuration box to expand it.
Scroll down to Advanced settings and expand the accordion.
Find the section for Consent settings and expand it.
Select the radial button labeled No additional consent required.
Set your Google Tag to fire on Initialization – All Pages
Click anywhere within the triggering box to open the triggering settings for your Google Tag.
Select Initialization – All Pages as your primary trigger.Note: do not use the trigger Consent initialization – All Pages. This is for consent platforms. Using it may result in your Google Tag firing before we can set the current consent state and your tags may not run correctly or be blocked completely.
Add a second trigger that fires when a user updates their consent preferences
Click the + button to add another trigger.
Choose Custom Event as the trigger type.
Enter consentUpdate as the event name. This is an event sent by our consent banner that contains the users updated consent preferences. It fires on every page load or when a user updates their consent preferences.
Configure firing behavior of your tag
Click anywhere within the tag configuration box to expand it’s settings.
Under advanced settings, set the Tag firing options to Once per page. This prevents the tag from firing multiple times if a user updates their consent preferences twice on the same page.
Click Save to save the tag configuration.
Part 7.5: Implementing basic consent mode for non-Google tags
In a Basic Consent Mode setup, tags are configured to require additional consent checks before they can fire. This is useful for non-Google any non-Google tracking codes, e.g. your HotJar or Klaviyo tacking codes if you don’t want to use our script blocking functionality, and instead run your tags off an event in GTM.
From the consent overview window, select the tag you wish to configure for Basic Consent Mode.
Click anywhere within the tag configuration box to expand it.
Scroll down to Advanced settings and expand the accordion.
Find the section for Consent settings and expand it.
Select the radial button labeled Require additional consent for tag to fire.
For these tags, you can use the same triggering and tag firing settings used by your Google Tag.
Part 8: Publish your GTM container.
Publish your GTM container by clicking Submit in the top right of the window, your GTM is configured and consent mode should be active!
Part 9: Verify Consent Mode is installed correctly
This sounds more complicated than it is, but we highly recommend verifying that everything works. Reach out to us if you’re struggling!
Use GTM debug view to check consent state is being updated
Open Preview / Debug mode in GTM using the Preview button in the top right of your workspace.
Input your websites URL in the tag assistant popup.
Two tabs should load, one containing your tag assistant, the other containing your website.
Wait for your website to load.
If your consent banner, do not interact with it yet – continue to step 10.
If your consent banner doesn’t load, you may have already have saved cookie preferences on your site. You’ll need to delete them.
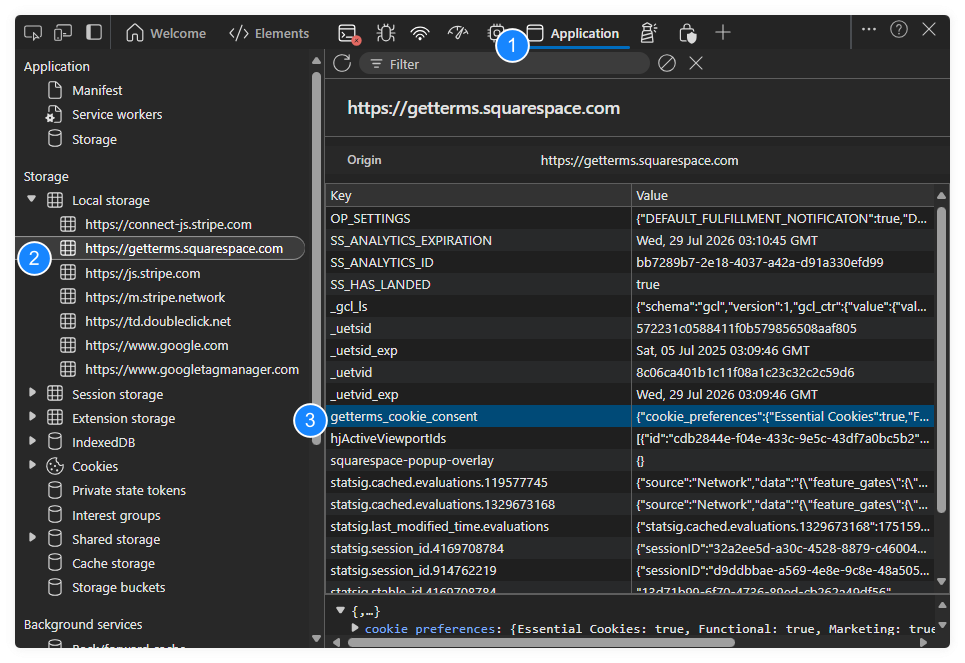
Open your browsers developer tools and open the application tab.
Under local storage for your domain, select and delete the getterms_cookie_consent item to remove your current preferences.
Refresh your page and wait for your consent banner to load.
Open the browser tab that contains your tag assistant window.
Select the most recent initialization event in the summary side panel.
You should see that your Google tag was fired, but any tags setup for basic consent were blocked as they required additional consent.
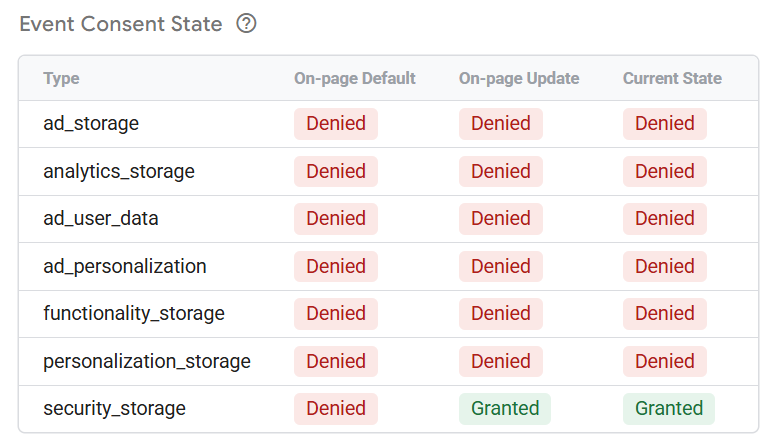
Navigate to the Consent tab in the box labelled Output of GTM-########.
Confirm that consent values match the settings from your consent banner. If you haven’t accepted cookies, all except Security storage should show Denied.
Open the tab containing the preview of your website.
Accept all cookies using your Consent Banner.
Open your tag assistant tab and select the new initializaton event.
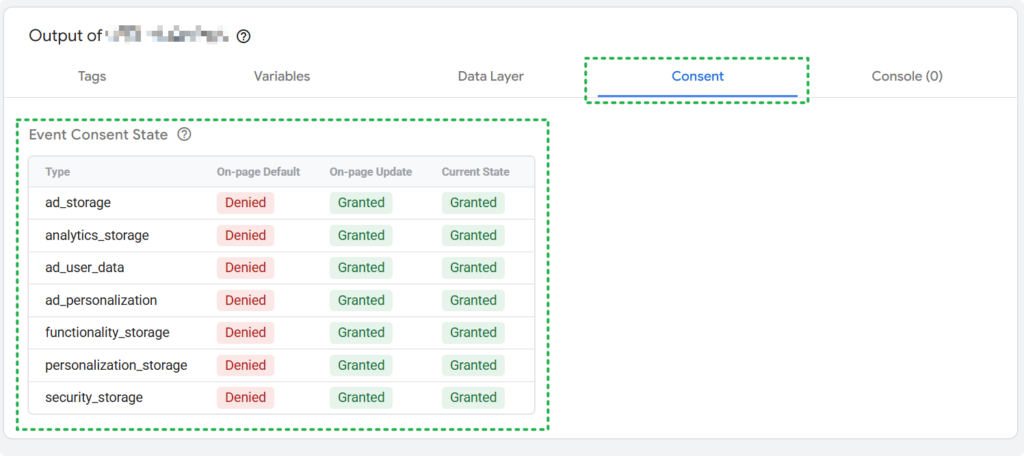
Navigate to the Consent tab in the box labelled Output of GTM-########.
The default state should still say denied for all storage types, but the on-page update and current state should display all storage types set to Granted.If you reject all cookies, the consent tab should show all cookies except security storage as ‘Denied’.
Troubleshooting
Consent showing denied for all storage types when cookies are accepted?
If you have consented to all cookies via your consent banner, but the event your Google Tag fires on displays all types of cookies as Denied, you may be firing our cookie banner or the GetTerms Consent Management tag after your Google Tag. This means we are not able to update the current state of consent state before your Google Tag fires.
If all consent types display as Denied despite full user consent:
Check the firing order of your tags.
Ensure the Consent Management tag or banner fires on Consent Initialization.
Ensure your Google Tag fires on Initialization – All Pages and consentUpdate – not Consent initialization – all pages


 If you reject all cookies, the consent tab should show all cookies except security storage as ‘Denied’.